1. 事件流
事件流描述的是从页面中接收事件的顺序。当某个事件发生时,浏览器会按照特定的顺序将事件传递给相关的元素。
1.1 事件流与两个阶段说明
事件流的概念
事件流是指事件在页面中传播的路径。当用户在页面上进行某种操作(如点击一个按钮)时,浏览器会按照特定的顺序将这个事件传递给相关的元素。
事件流的两个阶段
事件流包含两个主要的传播阶段:
捕获阶段(Event Capturing Phase)
- 从
document对象开始,逐层向下传递到目标元素 - 事件从最外层的元素向内传播
- 捕获阶段会依次触发祖先元素上绑定的捕获阶段事件处理函数
- 从
冒泡阶段(Event Bubbling Phase)
- 从目标元素开始,逐层向上传递回
document对象 - 事件从最内层的元素向外传播
- 冒泡阶段会依次触发祖先元素上绑定的冒泡阶段事件处理函数
- 从目标元素开始,逐层向上传递回
事件流示意图
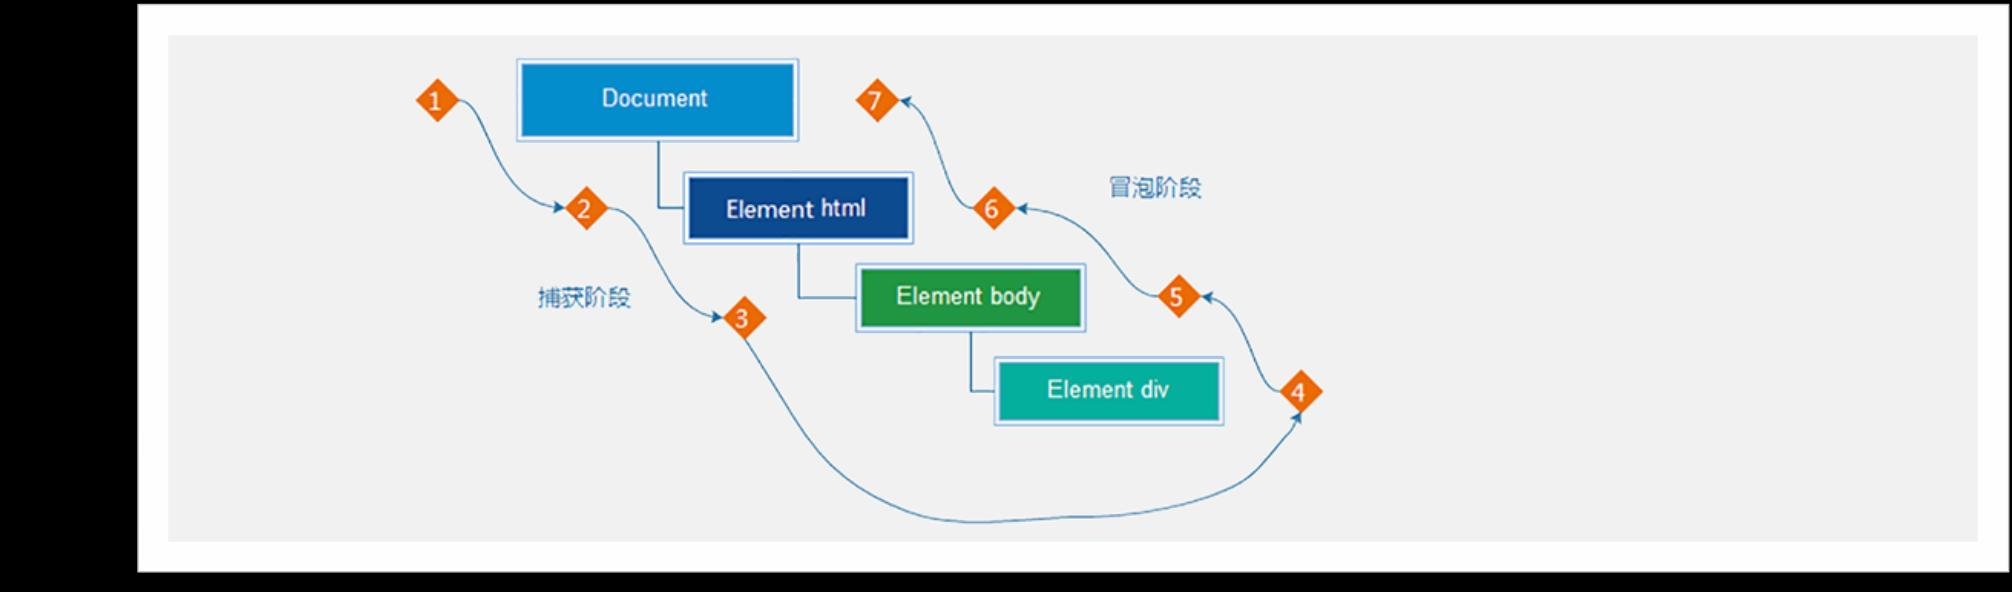
完整的事件流过程
- 捕获阶段:document → html → body → div → button
- 目标阶段:在 button 元素上触发事件
- 冒泡阶段:button → div → body → html → document
示例代码
<!DOCTYPE html>
<html lang="en">
<head>
    <meta charset="UTF-8">
    <title>事件流演示</title>
    <style>
        #outer {
            width: 300px;
            height: 300px;
            background-color: lightblue;
            padding: 20px;
        }
        #middle {
            width: 200px;
            height: 200px;
            background-color: lightgreen;
            padding: 20px;
        }
        #inner {
            width: 100px;
            height: 100px;
            background-color: lightcoral;
            display: flex;
            align-items: center;
            justify-content: center;
        }
    </style>
</head>
<body>
    <div id="outer">
        <div id="middle">
            <div id="inner">点击我</div>
        </div>
    </div>

    <script>
        const outer = document.getElementById('outer');
        const middle = document.getElementById('middle');
        const inner = document.getElementById('inner');

        // 默认使用冒泡阶段(第三个参数不传或为 false)
        outer.addEventListener('click', function() {
            console.log('外层元素 - 冒泡阶段');
        });

        middle.addEventListener('click', function() {
            console.log('中层元素 - 冒泡阶段');
        });

        inner.addEventListener('click', function() {
            console.log('内层元素 - 冒泡阶段(目标)');
        });

        // 点击内层元素时的输出顺序:
        // 1. 内层元素 - 冒泡阶段(目标)
        // 2. 中层元素 - 冒泡阶段
        // 3. 外层元素 - 冒泡阶段
    </script>
</body>
</html>
1.2 事件捕获
事件捕获的概念
事件捕获是指事件从最外层的 document 对象开始,沿着 DOM 树向下传递,直到到达目标元素的过程。
在捕获阶段,事件会依次触发祖先元素上设置了捕获阶段的事件处理函数。
如何使用事件捕获
通过 addEventListener() 方法的第三个参数设置为 true 来启用事件捕获:
element.addEventListener(event, function, true);
// 或
element.addEventListener(event, function, { capture: true });
事件捕获示例
<!DOCTYPE html>
<html lang="en">
<head>
    <meta charset="UTF-8">
    <title>事件捕获演示</title>
    <style>
        #outer {
            width: 300px;
            height: 300px;
            background-color: lightblue;
            padding: 20px;
        }
        #middle {
            width: 200px;
            height: 200px;
            background-color: lightgreen;
            padding: 20px;
        }
        #inner {
            width: 100px;
            height: 100px;
            background-color: lightcoral;
            display: flex;
            align-items: center;
            justify-content: center;
        }
    </style>
</head>
<body>
    <div id="outer">
        <div id="middle">
            <div id="inner">点击我</div>
        </div>
    </div>

    <script>
        const outer = document.getElementById('outer');
        const middle = document.getElementById('middle');
        const inner = document.getElementById('inner');

        // 使用捕获阶段(第三个参数为 true)
        outer.addEventListener('click', function() {
            console.log('外层元素 - 捕获阶段');
        }, true);

        middle.addEventListener('click', function() {
            console.log('中层元素 - 捕获阶段');
        }, true);

        inner.addEventListener('click', function() {
            console.log('内层元素 - 捕获阶段(目标)');
        }, true);

        // 点击内层元素时的输出顺序:
        // 1. 外层元素 - 捕获阶段
        // 2. 中层元素 - 捕获阶段
        // 3. 内层元素 - 捕获阶段(目标)
    </script>
</body>
</html>
捕获阶段和冒泡阶段混合使用
<!DOCTYPE html>
<html lang="en">
<head>
    <meta charset="UTF-8">
    <title>捕获和冒泡混合</title>
    <style>
        #parent {
            width: 300px;
            height: 300px;
            background-color: lightblue;
            padding: 20px;
        }
        #child {
            width: 150px;
            height: 150px;
            background-color: lightcoral;
            display: flex;
            align-items: center;
            justify-content: center;
        }
    </style>
</head>
<body>
    <div id="parent">
        <div id="child">点击我</div>
    </div>

    <script>
        const parent = document.getElementById('parent');
        const child = document.getElementById('child');

        // 父元素使用捕获阶段
        parent.addEventListener('click', function() {
            console.log('父元素 - 捕获阶段');
        }, true);

        // 子元素使用冒泡阶段(默认)
        child.addEventListener('click', function() {
            console.log('子元素 - 冒泡阶段(目标)');
        });

        // 父元素也绑定冒泡阶段
        parent.addEventListener('click', function() {
            console.log('父元素 - 冒泡阶段');
        });

        // 点击子元素时的输出顺序:
        // 1. 父元素 - 捕获阶段
        // 2. 子元素 - 冒泡阶段(目标)
        // 3. 父元素 - 冒泡阶段
    </script>
</body>
</html>
1.3 事件冒泡
事件冒泡的概念
事件冒泡是指事件从目标元素开始,沿着 DOM 树向上传递,直到到达 document 对象的过程。
在冒泡阶段,事件会依次触发祖先元素上绑定的冒泡阶段事件处理函数。
默认行为
addEventListener() 方法默认在冒泡阶段触发事件(第三个参数默认为 false)。
事件冒泡示例
<!DOCTYPE html>
<html lang="en">
<head>
    <meta charset="UTF-8">
    <title>事件冒泡演示</title>
    <style>
        .box {
            padding: 20px;
            margin: 10px;
            border: 2px solid #333;
        }
        #grandparent {
            background-color: lightyellow;
            width: 400px;
        }
        #parent {
            background-color: lightgreen;
            width: 300px;
        }
        #child {
            background-color: lightcoral;
            width: 200px;
            padding: 20px;
            text-align: center;
        }
    </style>
</head>
<body>
    <div id="grandparent">
        <div id="parent">
            <div id="child">点击我</div>
        </div>
    </div>

    <script>
        const grandparent = document.getElementById('grandparent');
        const parent = document.getElementById('parent');
        const child = document.getElementById('child');

        grandparent.addEventListener('click', function() {
            console.log('祖父元素被点击');
        });

        parent.addEventListener('click', function() {
            console.log('父元素被点击');
        });

        child.addEventListener('click', function() {
            console.log('子元素被点击(目标元素)');
        });

        // 点击子元素时的输出顺序:
        // 1. 子元素被点击(目标元素)
        // 2. 父元素被点击
        // 3. 祖父元素被点击
    </script>
</body>
</html>
验证冒泡的层级关系
<!DOCTYPE html>
<html lang="en">
<head>
    <meta charset="UTF-8">
    <title>验证冒泡层级</title>
</head>
<body>
    <div id="div1">
        <div id="div2">
            <button id="btn">点击按钮</button>
        </div>
    </div>

    <script>
        const div1 = document.getElementById('div1');
        const div2 = document.getElementById('div2');
        const btn = document.getElementById('btn');

        div1.addEventListener('click', function(event) {
            console.log('div1 - currentTarget:', event.currentTarget.id);
            console.log('div1 - target:', event.target.id);
        });

        div2.addEventListener('click', function(event) {
            console.log('div2 - currentTarget:', event.currentTarget.id);
            console.log('div2 - target:', event.target.id);
        });

        btn.addEventListener('click', function(event) {
            console.log('btn - currentTarget:', event.currentTarget.id);
            console.log('btn - target:', event.target.id);
        });

        // 点击按钮时的输出:
        // btn - currentTarget: btn
        // btn - target: btn
        // div2 - currentTarget: div2
        // div2 - target: btn
        // div1 - currentTarget: div1
        // div1 - target: btn

        // 说明:
        // - currentTarget 始终是当前绑定事件的元素
        // - target 是实际触发事件的元素(在冒泡过程中始终是按钮)
    </script>
</body>
</html>
哪些事件不冒泡
并非所有事件都会冒泡,常见的不冒泡的事件包括:
focus/blur(获取/失去焦点)mouseenter/mouseleave(鼠标进入/离开)load/unload(加载/卸载)scroll(滚动)
// focus 和 blur 不会冒泡
input.addEventListener('focus', function() {
    console.log('输入框获得焦点');
});

document.addEventListener('focus', function() {
    console.log('这行代码不会执行'); // focus 不会冒泡到 document
});

// mouseenter 和 mouseleave 不会冒泡
div.addEventListener('mouseenter', function() {
    console.log('鼠标进入元素');
});

// 如果需要类似的冒泡行为,可以使用 mouseover 和 mouseout
div.addEventListener('mouseover', function() {
    console.log('鼠标移过元素(会冒泡)');
});
1.4 阻止冒泡
阻止冒泡的概念
阻止冒泡是指中断事件在冒泡阶段的传播,使事件不再继续向上传递到祖先元素。
如何阻止冒泡
使用事件对象的 stopPropagation() 方法:
element.addEventListener('click', function(event) {
    event.stopPropagation(); // 阻止事件冒泡
});
阻止冒泡示例
<!DOCTYPE html>
<html lang="en">
<head>
    <meta charset="UTF-8">
    <title>阻止冒泡演示</title>
    <style>
        #outer {
            width: 300px;
            height: 300px;
            background-color: lightblue;
            padding: 20px;
        }
        #inner {
            width: 150px;
            height: 150px;
            background-color: lightcoral;
            display: flex;
            align-items: center;
            justify-content: center;
        }
    </style>
</head>
<body>
    <div id="outer">
        <div id="inner">点击我</div>
    </div>

    <script>
        const outer = document.getElementById('outer');
        const inner = document.getElementById('inner');

        outer.addEventListener('click', function() {
            console.log('外层元素被点击');
        });

        inner.addEventListener('click', function(event) {
            console.log('内层元素被点击');
            event.stopPropagation(); // 阻止事件冒泡到外层元素
        });

        // 点击内层元素时的输出:
        // 内层元素被点击
        // (外层元素不会被触发)
    </script>
</body>
</html>
阻止冒泡的实际应用场景
场景1:弹窗点击外部关闭
<!DOCTYPE html>
<html lang="en">
<head>
    <meta charset="UTF-8">
    <title>弹窗点击外部关闭</title>
    <style>
        #overlay {
            position: fixed;
            top: 0;
            left: 0;
            width: 100%;
            height: 100%;
            background-color: rgba(0, 0, 0, 0.5);
            display: none;
            align-items: center;
            justify-content: center;
        }
        #modal {
            width: 300px;
            height: 200px;
            background-color: white;
            padding: 20px;
            border-radius: 8px;
        }
        #btn {
            padding: 10px 20px;
            font-size: 16px;
        }
    </style>
</head>
<body>
    <button id="btn">打开弹窗</button>

    <div id="overlay">
        <div id="modal">
            <h2>弹窗内容</h2>
            <p>点击遮罩层可以关闭弹窗</p>
            <p>点击弹窗内部不会关闭</p>
        </div>
    </div>

    <script>
        const btn = document.getElementById('btn');
        const overlay = document.getElementById('overlay');
        const modal = document.getElementById('modal');

        // 打开弹窗
        btn.addEventListener('click', function() {
            overlay.style.display = 'flex';
        });

        // 点击遮罩层关闭弹窗
        overlay.addEventListener('click', function() {
            overlay.style.display = 'none';
        });

        // 阻止点击弹窗内部时冒泡到遮罩层
        modal.addEventListener('click', function(event) {
            event.stopPropagation(); // 点击弹窗内部时不会触发遮罩层的点击事件
        });
    </script>
</body>
</html>
场景2:下拉菜单点击不关闭
<!DOCTYPE html>
<html lang="en">
<head>
    <meta charset="UTF-8">
    <title>下拉菜单</title>
    <style>
        #dropdown {
            position: relative;
            display: inline-block;
        }
        #toggle {
            padding: 10px 20px;
            background-color: #4CAF50;
            color: white;
            border: none;
            cursor: pointer;
        }
        #menu {
            display: none;
            position: absolute;
            background-color: white;
            min-width: 160px;
            box-shadow: 0 8px 16px rgba(0,0,0,0.2);
        }
        #menu a {
            display: block;
            padding: 12px 16px;
            text-decoration: none;
            color: black;
        }
        #menu a:hover {
            background-color: #f1f1f1;
        }
    </style>
</head>
<body>
    <div id="dropdown">
        <button id="toggle">下拉菜单</button>
        <div id="menu">
            <a href="#">选项1</a>
            <a href="#">选项2</a>
            <a href="#">选项3</a>
        </div>
    </div>

    <script>
        const dropdown = document.getElementById('dropdown');
        const toggle = document.getElementById('toggle');
        const menu = document.getElementById('menu');

        // 切换菜单显示
        toggle.addEventListener('click', function(event) {
            event.stopPropagation(); // 阻止冒泡
            menu.style.display = menu.style.display === 'block' ? 'none' : 'block';
        });

        // 阻止菜单内部的点击事件冒泡
        menu.addEventListener('click', function(event) {
            event.stopPropagation();
        });

        // 点击页面其他地方关闭菜单
        document.addEventListener('click', function() {
            menu.style.display = 'none';
        });
    </script>
</body>
</html>
场景3:嵌套列表点击
<!DOCTYPE html>
<html lang="en">
<head>
    <meta charset="UTF-8">
    <title>嵌套列表</title>
    <style>
        .list {
            padding: 10px;
            margin: 10px;
            border: 2px solid #333;
        }
        #list1 {
            background-color: lightyellow;
        }
        #list2 {
            background-color: lightgreen;
        }
        .item {
            padding: 10px;
            margin: 5px;
            background-color: lightcoral;
            cursor: pointer;
        }
    </style>
</head>
<body>
    <div id="list1" class="list">
        <h3>外层列表</h3>
        <div id="list2" class="list">
            <h3>内层列表</h3>
            <div class="item">项目1</div>
            <div class="item">项目2</div>
        </div>
    </div>

    <script>
        const list1 = document.getElementById('list1');
        const list2 = document.getElementById('list2');
        const items = document.querySelectorAll('.item');

        list1.addEventListener('click', function() {
            console.log('外层列表被点击');
        });

        list2.addEventListener('click', function(event) {
            event.stopPropagation(); // 阻止冒泡到外层列表
            console.log('内层列表被点击');
        });

        items.forEach(function(item) {
            item.addEventListener('click', function(event) {
                event.stopPropagation(); // 阻止冒泡到列表
                console.log('项目被点击:', this.textContent);
            });
        });

        // 点击项目时的输出:
        // 项目被点击: 项目1
        // (列表和外层列表都不会被触发)
    </script>
</body>
</html>
stopImmediatePropagation()
stopImmediatePropagation() 不仅阻止事件冒泡,还会阻止同一个元素上绑定的其他事件处理函数:
<!DOCTYPE html>
<html lang="en">
<head>
    <meta charset="UTF-8">
    <title>stopImmediatePropagation</title>
</head>
<body>
    <button id="btn">点击我</button>

    <script>
        const btn = document.getElementById('btn');

        btn.addEventListener('click', function(event) {
            console.log('第一个处理函数');
            event.stopImmediatePropagation(); // 阻止冒泡和同一元素的其他处理函数
        });

        btn.addEventListener('click', function() {
            console.log('第二个处理函数'); // 这行不会执行
        });

        document.addEventListener('click', function() {
            console.log('document 被点击'); // 这行也不会执行
        });

        // 点击按钮时的输出:
        // 第一个处理函数
    </script>
</body>
</html>
1.5 解绑事件
解绑事件的概念
解绑事件是指移除之前通过 addEventListener() 添加的事件监听器。
解绑事件的方法
使用 removeEventListener() 方法:
element.removeEventListener(event, function, useCapture);解绑事件的注意事项
重要: removeEventListener() 只能移除使用命名函数添加的监听器,无法移除使用匿名函数或箭头函数添加的监听器。
解绑事件示例
示例1:基本的解绑事件
<!DOCTYPE html>
<html lang="en">
<head>
    <meta charset="UTF-8">
    <title>解绑事件</title>
</head>
<body>
    <button id="btn1">点击我</button>
    <button id="btn2">解除绑定</button>

    <script>
        const btn1 = document.getElementById('btn1');
        const btn2 = document.getElementById('btn2');

        // 定义事件处理函数
        function handleClick() {
            console.log('按钮被点击了!');
        }

        // 添加事件监听
        btn1.addEventListener('click', handleClick);

        // 解除事件绑定
        btn2.addEventListener('click', function() {
            btn1.removeEventListener('click', handleClick);
            console.log('事件已解除绑定');
        });
    </script>
</body>
</html>
示例2:无法移除匿名函数
// 添加事件监听(使用匿名函数)
btn.addEventListener('click', function() {
    console.log('点击事件');
});

// 无法移除!因为这是不同的函数对象
btn.removeEventListener('click', function() {
    console.log('点击事件');
});
示例3:一次性事件监听
<!DOCTYPE html>
<html lang="en">
<head>
    <meta charset="UTF-8">
    <title>一次性事件</title>
</head>
<body>
    <button id="btn">点击我(只能点击一次)</button>

    <script>
        const btn = document.getElementById('btn');

        function handleClick() {
            console.log('按钮被点击了!');
            console.log('解除绑定...');

            // 触发后立即解绑
            btn.removeEventListener('click', handleClick);
            btn.textContent = '已解除绑定';
            btn.disabled = true;
        }

        btn.addEventListener('click', handleClick);
    </script>
</body>
</html>
示例4:使用选项对象添加和移除
// 添加事件监听(使用选项对象)
function handleClick() {
    console.log('点击事件');
}

btn.addEventListener('click', handleClick, { capture: true });

// 移除时也要使用相同的选项
btn.removeEventListener('click', handleClick, { capture: true });
示例5:解绑所有指定类型的监听器
由于没有直接的方法一次性移除所有监听器,可以使用克隆节点的方式:
<!DOCTYPE html>
<html lang="en">
<head>
    <meta charset="UTF-8">
    <title>解绑所有监听器</title>
</head>
<body>
    <button id="btn">点击我</button>
    <button id="reset">重置按钮</button>

    <script>
        const btn = document.getElementById('btn');
        const reset = document.getElementById('reset');

        // 添加多个事件监听
        btn.addEventListener('click', function() {
            console.log('第一个监听器');
        });

        btn.addEventListener('click', function() {
            console.log('第二个监听器');
        });

        btn.addEventListener('click', function() {
            console.log('第三个监听器');
        });

        // 重置按钮 - 移除所有事件监听器
        reset.addEventListener('click', function() {
            // 克隆节点(新节点不会继承原节点的事件监听器)
            const newBtn = btn.cloneNode(true);

            // 替换原节点
            btn.parentNode.replaceChild(newBtn, btn);

            // 更新引用
            const newBtnRef = document.getElementById('btn');
            newBtnRef.addEventListener('click', function() {
                console.log('新的监听器');
            });

            console.log('所有监听器已移除');
        });
    </script>
</body>
</html>
示例6:处理多个事件类型的解绑
<!DOCTYPE html>
<html lang="en">
<head>
    <meta charset="UTF-8">
    <title>多个事件类型解绑</title>
    <style>
        #box {
            width: 200px;
            height: 200px;
            background-color: lightblue;
            margin: 20px;
        }
    </style>
</head>
<body>
    <div id="box">鼠标移入移出我</div>
    <button id="unbind">解绑所有事件</button>

    <script>
        const box = document.getElementById('box');
        const unbind = document.getElementById('unbind');

        // 定义事件处理函数
        function handleMouseEnter() {
            console.log('鼠标进入');
            this.style.background = 'lightgreen';
        }

        function handleMouseLeave() {
            console.log('鼠标离开');
            this.style.background = 'lightblue';
        }

        function handleClick() {
            console.log('点击');
        }

        // 添加多个事件监听
        box.addEventListener('mouseenter', handleMouseEnter);
        box.addEventListener('mouseleave', handleMouseLeave);
        box.addEventListener('click', handleClick);

        // 解绑所有事件
        unbind.addEventListener('click', function() {
            box.removeEventListener('mouseenter', handleMouseEnter);
            box.removeEventListener('mouseleave', handleMouseLeave);
            box.removeEventListener('click', handleClick);
            console.log('所有事件已解绑');
        });
    </script>
</body>
</html>
示例7:事件监听器数组管理
<!DOCTYPE html>
<html lang="en">
<head>
    <meta charset="UTF-8">
    <title>管理多个监听器</title>
</head>
<body>
    <button id="btn">点击我</button>
    <button id="add">添加监听器</button>
    <button id="remove">移除监听器</button>
    <button id="clear">清空所有监听器</button>

    <script>
        const btn = document.getElementById('btn');
        const addBtn = document.getElementById('add');
        const removeBtn = document.getElementById('remove');
        const clearBtn = document.getElementById('clear');

        // 存储所有的事件监听器
        let listeners = [];
        let count = 0;

        // 添加监听器
        addBtn.addEventListener('click', function() {
            count++;
            const handler = function() {
                console.log('监听器 ' + count + ' 被触发');
            };

            btn.addEventListener('click', handler);
            listeners.push(handler);
            console.log('已添加监听器 ' + count);
        });

        // 移除最后一个监听器
        removeBtn.addEventListener('click', function() {
            if (listeners.length > 0) {
                const handler = listeners.pop();
                btn.removeEventListener('click', handler);
                console.log('已移除监听器');
            } else {
                console.log('没有监听器可移除');
            }
        });

        // 清空所有监听器
        clearBtn.addEventListener('click', function() {
            listeners.forEach(function(handler) {
                btn.removeEventListener('click', handler);
            });
            listeners = [];
            count = 0;
            console.log('已清空所有监听器');
        });
    </script>
</body>
</html>
解绑事件的总结
- 使用命名函数:只有使用命名函数添加的监听器才能被正确移除
- 参数匹配:移除时的事件类型、处理函数、捕获选项必须与添加时完全一致
- 一次性事件:可以在事件处理函数内部移除自身
- 批量移除:可以通过克隆节点或维护监听器数组来批量移除
- 内存管理:及时解绑不再需要的事件监听器,避免内存泄漏
2. 事件委托
2.1 事件委托的概念
事件委托(Event Delegation)是一种利用事件冒泡机制来处理事件的技术。它不直接给每个子元素绑定事件,而是将事件绑定到父元素上,通过事件冒泡来处理所有子元素的事件。
核心思想: 利用事件冒泡,在父元素上统一监听和处理子元素的事件。
2.2 事件委托的原理
事件委托的原理基于以下两个特性:
- 事件冒泡:当子元素触发事件时,事件会向上冒泡到父元素
- 事件对象:通过
event.target可以获取实际触发事件的元素
// 事件委托的基本原理
parent.addEventListener('click', function(event) {
    // event.target 是实际被点击的元素
    const clickedElement = event.target;

    // 判断是否是我们想要的元素
    if (clickedElement.classList.contains('item')) {
        console.log('点击了项目:', clickedElement.textContent);
    }
});
2.3 事件委托的优点
- 减少内存占用:只需要在父元素上绑定一个事件监听器,而不是为每个子元素都绑定
- 动态元素支持:新增的子元素自动继承父元素的事件处理,无需重新绑定
- 提高性能:减少事件监听器的数量,提高页面加载和运行速度
- 简化代码:统一管理事件处理逻辑,代码更简洁易维护
- 便于管理:所有子元素的事件都在一个地方处理,更容易统一修改
2.4 事件委托的基本使用
示例1:基础的列表点击
<!DOCTYPE html>
<html lang="en">
<head>
    <meta charset="UTF-8">
    <title>事件委托基础</title>
    <style>
        #list {
            list-style: none;
            padding: 0;
        }
        .item {
            padding: 10px;
            margin: 5px 0;
            background-color: lightblue;
            cursor: pointer;
        }
        .item:hover {
            background-color: lightgreen;
        }
    </style>
</head>
<body>
    <ul id="list">
        <li class="item">项目 1</li>
        <li class="item">项目 2</li>
        <li class="item">项目 3</li>
        <li class="item">项目 4</li>
        <li class="item">项目 5</li>
    </ul>

    <script>
        const list = document.getElementById('list');

        // 使用事件委托:只在父元素上绑定一个事件
        list.addEventListener('click', function(event) {
            // 检查点击的是否是 li.item 元素
            if (event.target.classList.contains('item')) {
                console.log('点击了:', event.target.textContent);

                // 高亮被点击的项目
                // 先移除所有项目的高亮
                document.querySelectorAll('.item').forEach(function(item) {
                    item.style.background = 'lightblue';
                });

                // 高亮当前项目
                event.target.style.background = 'lightcoral';
            }
        });
    </script>
</body>
</html>
示例2:动态添加元素
<!DOCTYPE html>
<html lang="en">
<head>
    <meta charset="UTF-8">
    <title>动态添加元素</title>
    <style>
        #container {
            padding: 20px;
        }
        .button {
            padding: 10px 20px;
            margin: 5px;
            background-color: #4CAF50;
            color: white;
            border: none;
            cursor: pointer;
        }
        .button:hover {
            background-color: #45a049;
        }
        #addBtn {
            background-color: #2196F3;
            margin-bottom: 20px;
        }
        #addBtn:hover {
            background-color: #0b7dda;
        }
    </style>
</head>
<body>
    <button id="addBtn">添加按钮</button>
    <div id="container">
        <button class="button">按钮 1</button>
        <button class="button">按钮 2</button>
        <button class="button">按钮 3</button>
    </div>

    <script>
        const container = document.getElementById('container');
        const addBtn = document.getElementById('addBtn');
        let count = 3;

        // 使用事件委托:在容器上监听所有按钮的点击
        container.addEventListener('click', function(event) {
            // 检查点击的是否是 button 元素
            if (event.target.classList.contains('button')) {
                console.log('点击了:', event.target.textContent);
                alert('你点击了: ' + event.target.textContent);
            }
        });

        // 动态添加按钮
        addBtn.addEventListener('click', function() {
            count++;
            const newBtn = document.createElement('button');
            newBtn.className = 'button';
            newBtn.textContent = '按钮 ' + count;
            container.appendChild(newBtn);

            console.log('添加了:', newBtn.textContent);
            // 新添加的按钮自动拥有点击事件,无需重新绑定!
        });
    </script>
</body>
</html>
2.5 事件委托的实际应用场景
场景1:表格操作
<!DOCTYPE html>
<html lang="en">
<head>
    <meta charset="UTF-8">
    <title>表格事件委托</title>
    <style>
        table {
            border-collapse: collapse;
            width: 100%;
        }
        th, td {
            border: 1px solid #ddd;
            padding: 8px;
            text-align: left;
        }
        th {
            background-color: #f2f2f2;
        }
        tr:hover {
            background-color: #f5f5f5;
        }
        .delete-btn {
            background-color: #f44336;
            color: white;
            border: none;
            padding: 5px 10px;
            cursor: pointer;
        }
        .delete-btn:hover {
            background-color: #d32f2f;
        }
    </style>
</head>
<body>
    <table id="table">
        <thead>
            <tr>
                <th>ID</th>
                <th>姓名</th>
                <th>年龄</th>
                <th>操作</th>
            </tr>
        </thead>
        <tbody>
            <tr>
                <td>1</td>
                <td>张三</td>
                <td>25</td>
                <td><button class="delete-btn">删除</button></td>
            </tr>
            <tr>
                <td>2</td>
                <td>李四</td>
                <td>30</td>
                <td><button class="delete-btn">删除</button></td>
            </tr>
            <tr>
                <td>3</td>
                <td>王五</td>
                <td>28</td>
                <td><button class="delete-btn">删除</button></td>
            </tr>
        </tbody>
    </table>

    <script>
        const table = document.getElementById('table');

        // 使用事件委托处理删除按钮
        table.addEventListener('click', function(event) {
            // 检查是否点击了删除按钮
            if (event.target.classList.contains('delete-btn')) {
                // 获取按钮所在的行
                const row = event.target.closest('tr');

                // 获取姓名
                const name = row.cells[1].textContent;

                // 确认删除
                if (confirm('确定要删除 ' + name + ' 吗?')) {
                    row.remove();
                    console.log('已删除:', name);
                }
            }
        });
    </script>
</body>
</html>
场景2:选项卡切换
<!DOCTYPE html>
<html lang="en">
<head>
    <meta charset="UTF-8">
    <title>选项卡</title>
    <style>
        #tabs {
            display: flex;
            margin-bottom: 20px;
        }
        .tab {
            padding: 10px 20px;
            margin-right: 5px;
            background-color: #ddd;
            cursor: pointer;
            border: none;
        }
        .tab.active {
            background-color: #4CAF50;
            color: white;
        }
        .content {
            display: none;
            padding: 20px;
            border: 1px solid #ddd;
            min-height: 100px;
        }
        .content.active {
            display: block;
        }
    </style>
</head>
<body>
    <div id="tabs">
        <button class="tab active" data-target="tab1">选项1</button>
        <button class="tab" data-target="tab2">选项2</button>
        <button class="tab" data-target="tab3">选项3</button>
    </div>

    <div class="content active" id="tab1">内容1</div>
    <div class="content" id="tab2">内容2</div>
    <div class="content" id="tab3">内容3</div>

    <script>
        const tabsContainer = document.getElementById('tabs');

        // 使用事件委托处理选项卡切换
        tabsContainer.addEventListener('click', function(event) {
            // 检查是否点击了选项卡按钮
            if (event.target.classList.contains('tab')) {
                // 移除所有选项卡的 active 类
                document.querySelectorAll('.tab').forEach(function(tab) {
                    tab.classList.remove('active');
                });

                // 为当前点击的选项卡添加 active 类
                event.target.classList.add('active');

                // 获取目标内容ID
                const targetId = event.target.getAttribute('data-target');

                // 隐藏所有内容
                document.querySelectorAll('.content').forEach(function(content) {
                    content.classList.remove('active');
                });

                // 显示对应的内容
                document.getElementById(targetId).classList.add('active');

                console.log('切换到:', event.target.textContent);
            }
        });
    </script>
</body>
</html>
场景3:购物车
<!DOCTYPE html>
<html lang="en">
<head>
    <meta charset="UTF-8">
    <title>购物车</title>
    <style>
        #cart {
            max-width: 600px;
            margin: 0 auto;
        }
        .cart-item {
            display: flex;
            justify-content: space-between;
            align-items: center;
            padding: 10px;
            border-bottom: 1px solid #ddd;
        }
        .item-info {
            flex: 1;
        }
        .item-name {
            font-weight: bold;
        }
        .item-price {
            color: #f44336;
        }
        .quantity {
            display: flex;
            align-items: center;
            margin: 0 20px;
        }
        .quantity button {
            width: 30px;
            height: 30px;
            border: 1px solid #ddd;
            background: white;
            cursor: pointer;
        }
        .quantity span {
            margin: 0 10px;
            min-width: 20px;
            text-align: center;
        }
        .remove-btn {
            background-color: #f44336;
            color: white;
            border: none;
            padding: 5px 10px;
            cursor: pointer;
        }
        .total {
            text-align: right;
            padding: 20px;
            font-size: 20px;
            font-weight: bold;
        }
    </style>
</head>
<body>
    <div id="cart">
        <h2>购物车</h2>
        <div id="cartItems">
            <div class="cart-item" data-price="100">
                <div class="item-info">
                    <div class="item-name">商品1</div>
                    <div class="item-price">¥100</div>
                </div>
                <div class="quantity">
                    <button class="decrease">-</button>
                    <span class="count">1</span>
                    <button class="increase">+</button>
                </div>
                <button class="remove-btn">删除</button>
            </div>
            <div class="cart-item" data-price="200">
                <div class="item-info">
                    <div class="item-name">商品2</div>
                    <div class="item-price">¥200</div>
                </div>
                <div class="quantity">
                    <button class="decrease">-</button>
                    <span class="count">1</span>
                    <button class="increase">+</button>
                </div>
                <button class="remove-btn">删除</button>
            </div>
        </div>
        <div class="total">总计: ¥300</div>
    </div>

    <script>
        const cart = document.getElementById('cart');

        // 使用事件委托处理购物车的所有操作
        cart.addEventListener('click', function(event) {
            const cartItem = event.target.closest('.cart-item');

            if (!cartItem) return;

            // 增加数量
            if (event.target.classList.contains('increase')) {
                const countSpan = cartItem.querySelector('.count');
                let count = parseInt(countSpan.textContent);
                count++;
                countSpan.textContent = count;
                updateTotal();
            }

            // 减少数量
            if (event.target.classList.contains('decrease')) {
                const countSpan = cartItem.querySelector('.count');
                let count = parseInt(countSpan.textContent);
                if (count > 1) {
                    count--;
                    countSpan.textContent = count;
                    updateTotal();
                }
            }

            // 删除商品
            if (event.target.classList.contains('remove-btn')) {
                if (confirm('确定要删除这个商品吗?')) {
                    cartItem.remove();
                    updateTotal();
                }
            }
        });

        // 更新总价
        function updateTotal() {
            let total = 0;
            document.querySelectorAll('.cart-item').forEach(function(item) {
                const price = parseInt(item.getAttribute('data-price'));
                const count = parseInt(item.querySelector('.count').textContent);
                total += price * count;
            });
            document.querySelector('.total').textContent = '总计: ¥' + total;
        }
    </script>
</body>
</html>
场景4:待办事项列表
<!DOCTYPE html>
<html lang="en">
<head>
    <meta charset="UTF-8">
    <title>待办事项</title>
    <style>
        #todoApp {
            max-width: 500px;
            margin: 0 auto;
            padding: 20px;
        }
        #inputArea {
            display: flex;
            margin-bottom: 20px;
        }
        #todoInput {
            flex: 1;
            padding: 10px;
            font-size: 16px;
        }
        #addBtn {
            padding: 10px 20px;
            background-color: #4CAF50;
            color: white;
            border: none;
            cursor: pointer;
            margin-left: 10px;
        }
        #todoList {
            list-style: none;
            padding: 0;
        }
        .todo-item {
            display: flex;
            align-items: center;
            padding: 10px;
            margin: 5px 0;
            background-color: #f9f9f9;
            border-radius: 5px;
        }
        .todo-item.completed {
            text-decoration: line-through;
            opacity: 0.6;
        }
        .todo-checkbox {
            margin-right: 10px;
            width: 20px;
            height: 20px;
            cursor: pointer;
        }
        .todo-text {
            flex: 1;
            cursor: pointer;
        }
        .delete-btn {
            background-color: #f44336;
            color: white;
            border: none;
            padding: 5px 10px;
            cursor: pointer;
            margin-left: 10px;
        }
    </style>
</head>
<body>
    <div id="todoApp">
        <h2>待办事项</h2>
        <div id="inputArea">
            <input type="text" id="todoInput" placeholder="输入待办事项">
            <button id="addBtn">添加</button>
        </div>
        <ul id="todoList">
            <li class="todo-item">
                <input type="checkbox" class="todo-checkbox">
                <span class="todo-text">学习JavaScript</span>
                <button class="delete-btn">删除</button>
            </li>
            <li class="todo-item completed">
                <input type="checkbox" class="todo-checkbox" checked>
                <span class="todo-text">学习HTML</span>
                <button class="delete-btn">删除</button>
            </li>
        </ul>
    </div>

    <script>
        const todoList = document.getElementById('todoList');
        const todoInput = document.getElementById('todoInput');
        const addBtn = document.getElementById('addBtn');

        // 使用事件委托处理所有待办事项的操作
        todoList.addEventListener('click', function(event) {
            const todoItem = event.target.closest('.todo-item');
            if (!todoItem) return;

            // 复选框点击
            if (event.target.classList.contains('todo-checkbox')) {
                todoItem.classList.toggle('completed', event.target.checked);
            }

            // 点击文本切换完成状态
            if (event.target.classList.contains('todo-text')) {
                const checkbox = todoItem.querySelector('.todo-checkbox');
                checkbox.checked = !checkbox.checked;
                todoItem.classList.toggle('completed', checkbox.checked);
            }

            // 删除按钮点击
            if (event.target.classList.contains('delete-btn')) {
                todoItem.remove();
            }
        });

        // 添加新的待办事项
        function addTodo() {
            const text = todoInput.value.trim();
            if (!text) {
                alert('请输入待办事项!');
                return;
            }

            const li = document.createElement('li');
            li.className = 'todo-item';
            li.innerHTML = `
                <input type="checkbox" class="todo-checkbox">
                <span class="todo-text">${text}</span>
                <button class="delete-btn">删除</button>
            `;

            todoList.appendChild(li);
            todoInput.value = '';

            // 新添加的事项自动拥有事件处理
        }

        addBtn.addEventListener('click', addTodo);
        todoInput.addEventListener('keypress', function(event) {
            if (event.key === 'Enter') {
                addTodo();
            }
        });
    </script>
</body>
</html>
2.6 事件委托的注意事项
1. 使用 closest() 方法处理嵌套元素
当子元素内部还有其他元素时,需要使用 closest() 方法找到正确的目标元素:
<div id="container">
    <div class="item">
        <span class="name">项目名称</span>
        <span class="description">项目描述</span>
        <button>删除</button>
    </div>
</div>

<script>
const container = document.getElementById('container');

container.addEventListener('click', function(event) {
    // 使用 closest() 找到最近的 .item 元素
    const item = event.target.closest('.item');

    if (item) {
        console.log('点击了项目:', item.querySelector('.name').textContent);
    }
});
</script>
2. 注意事件的 target 和 currentTarget
parent.addEventListener('click', function(event) {
    console.log('target:', event.target);      // 实际被点击的元素
    console.log('currentTarget:', event.currentTarget); // 绑定事件的父元素
});
3. 检查元素是否符合条件
container.addEventListener('click', function(event) {
    // 方式1:使用 classList.contains()
    if (event.target.classList.contains('button')) {
        // 处理按钮点击
    }

    // 方式2:使用 tagName
    if (event.target.tagName === 'BUTTON') {
        // 处理按钮点击
    }

    // 方式3:使用 closest() 处理嵌套元素
    if (event.target.closest('.item')) {
        const item = event.target.closest('.item');
        // 处理项目点击
    }

    // 方式4:检查 data 属性
    if (event.target.dataset.action === 'delete') {
        // 处理删除操作
    }
});
4. 性能考虑
虽然事件委托可以减少事件监听器的数量,但如果父元素有大量子元素,仍然需要注意性能:
// 如果子元素很多,可以在事件处理函数中尽早返回
container.addEventListener('click', function(event) {
    // 快速判断,不符合条件立即返回
    if (!event.target.classList.contains('item')) {
        return;
    }

    // 符合条件的处理逻辑
    console.log('处理项目点击');
});
2.7 事件委托的总结
优点:
- 减少内存占用,提高性能
- 动态添加的元素自动拥有事件处理
- 代码更简洁,便于维护
- 统一管理事件处理逻辑
适用场景:
- 大量相似元素的相同事件处理
- 动态添加或删除元素的列表
- 表格、列表等数据展示
- 需要统一管理的事件处理
注意事项:
- 使用
closest()处理嵌套元素 - 明确区分
target和currentTarget - 做好元素类型检查
- 注意性能优化
3. 其他事件
3.1 页面加载事件
页面加载事件用于监听页面或资源加载完成的不同阶段。
3.1.1 DOMContentLoaded 事件
当 DOM 结构完全加载完成时触发,不等待 CSS、图片等资源加载完成。
document.addEventListener('DOMContentLoaded', function() {
    console.log('DOM 结构加载完成');
    // 可以安全地操作 DOM 元素
    const btn = document.getElementById('btn');
    console.log(btn);
});
3.1.2 load 事件
当整个页面(包括所有依赖资源如 CSS、图片等)完全加载完成时触发。
window.addEventListener('load', function() {
    console.log('页面完全加载完成');
    // 所有资源都已加载完成
});
3.1.3 beforeunload 事件
当用户即将离开页面时触发,可以用于提醒用户是否保存未保存的更改。
window.addEventListener('beforeunload', function(event) {
    // 如果有未保存的更改
    const hasUnsavedChanges = true;

    if (hasUnsavedChanges) {
        // 标准方式
        event.preventDefault();
        // 兼容性处理
        event.returnValue = '';
    }
});
3.1.4 unload 事件
当页面即将被关闭或刷新时触发。
window.addEventListener('unload', function() {
    // 发送统计数据等
    navigator.sendBeacon('/analytics', JSON.stringify({ type: 'pageview' }));
});
3.1.5 页面加载事件示例
<!DOCTYPE html>
<html lang="en">
<head>
    <meta charset="UTF-8">
    <title>页面加载事件</title>
    <style>
        body {
            font-family: Arial, sans-serif;
            padding: 20px;
        }
        .status {
            padding: 10px;
            margin: 10px 0;
            border-radius: 5px;
        }
        .loading {
            background-color: #fff3cd;
            border: 1px solid #ffc107;
        }
        .done {
            background-color: #d4edda;
            border: 1px solid #28a745;
        }
    </style>
</head>
<body>
    <h2>页面加载状态</h2>
    <div id="domStatus" class="status loading">DOMContentLoaded: 等待中...</div>
    <div id="loadStatus" class="status loading">load: 等待中...</div>
    <img src="https://via.placeholder.com/400x300" alt="测试图片" style="max-width: 100%;">

    <script>
        // DOM 结构加载完成时触发
        document.addEventListener('DOMContentLoaded', function() {
            const status = document.getElementById('domStatus');
            status.textContent = 'DOMContentLoaded: DOM结构已加载完成';
            status.className = 'status done';
            console.log('DOMContentLoaded 触发');
        });

        // 页面完全加载完成时触发
        window.addEventListener('load', function() {
            const status = document.getElementById('loadStatus');
            status.textContent = 'load: 页面所有资源已加载完成';
            status.className = 'status done';
            console.log('load 触发');
        });

        // 页面即将离开时触发
        window.addEventListener('beforeunload', function(event) {
            console.log('beforeunload 触发');
            // 可以在这里提醒用户保存未保存的更改
        });

        console.log('脚本执行 - 此时 DOM 可能还未加载完成');
    </script>
</body>
</html>
3.1.6 页面加载事件对比
| 事件 | 触发时机 | 等待资源 |
|---|---|---|
| DOMContentLoaded | DOM 树构建完成 | 不等待 CSS、图片 |
| load | 所有资源加载完成 | 等待所有资源 |
| beforeunload | 用户即将离开 | - |
| unload | 页面关闭/刷新时 | - |
3.2 元素滚动事件
滚动事件在用户滚动页面或元素时触发。
3.2.1 基本滚动事件
// 监听页面滚动
window.addEventListener('scroll', function(event) {
    console.log('页面滚动距离:', window.scrollY);
    console.log('滚动位置:', window.scrollX);
});

// 监听某个元素的滚动
const container = document.getElementById('container');
container.addEventListener('scroll', function(event) {
    console.log('元素滚动距离:', container.scrollTop);
    console.log('元素滚动位置:', container.scrollLeft);
});
3.2.2 获取滚动位置
// 获取页面滚动位置
const scrollY = window.scrollY || window.pageYOffset;
const scrollX = window.scrollX || window.pageXOffset;

// 获取元素滚动位置
const element = document.getElementById('element');
const scrollTop = element.scrollTop;
const scrollLeft = element.scrollLeft;
3.2.3 滚动到指定位置
// 滚动到页面顶部
window.scrollTo(0, 0);

// 滚动到页面底部
window.scrollTo(0, document.body.scrollHeight);

// 平滑滚动到页面顶部
window.scrollTo({
    top: 0,
    behavior: 'smooth'
});

// 滚动到指定元素
const element = document.getElementById('target');
element.scrollIntoView();
element.scrollIntoView({ behavior: 'smooth' });
3.2.4 滚动事件应用示例
示例1:返回顶部按钮
<!DOCTYPE html>
<html lang="en">
<head>
    <meta charset="UTF-8">
    <title>返回顶部</title>
    <style>
        body {
            height: 2000px;
            font-family: Arial, sans-serif;
        }
        #backToTop {
            position: fixed;
            bottom: 30px;
            right: 30px;
            padding: 15px 25px;
            background-color: #4CAF50;
            color: white;
            border: none;
            border-radius: 5px;
            cursor: pointer;
            display: none;
            font-size: 16px;
        }
        #backToTop:hover {
            background-color: #45a049;
        }
    </style>
</head>
<body>
    <h1>页面滚动示例</h1>
    <p>向下滚动页面查看效果</p>
    <button id="backToTop">返回顶部</button>

    <script>
        const backToTopBtn = document.getElementById('backToTop');

        // 监听滚动事件
        window.addEventListener('scroll', function() {
            // 获取滚动距离
            const scrollY = window.scrollY || window.pageYOffset;

            // 当滚动超过 300px 时显示按钮
            if (scrollY > 300) {
                backToTopBtn.style.display = 'block';
            } else {
                backToTopBtn.style.display = 'none';
            }
        });

        // 点击返回顶部
        backToTopBtn.addEventListener('click', function() {
            window.scrollTo({
                top: 0,
                behavior: 'smooth'
            });
        });
    </script>
</body>
</html>
示例2:导航栏固定
<!DOCTYPE html>
<html lang="en">
<head>
    <meta charset="UTF-8">
    <title>导航栏固定</title>
    <style>
        * {
            margin: 0;
            padding: 0;
        }
        body {
            height: 2000px;
            font-family: Arial, sans-serif;
        }
        #navbar {
            width: 100%;
            padding: 15px 0;
            background-color: #333;
            color: white;
            text-align: center;
            transition: all 0.3s ease;
        }
        #navbar.fixed {
            position: fixed;
            top: 0;
            padding: 10px 0;
            background-color: #2196F3;
            box-shadow: 0 2px 5px rgba(0,0,0,0.3);
        }
        .content {
            padding: 100px 20px;
            max-width: 800px;
            margin: 0 auto;
        }
    </style>
</head>
<body>
    <div id="navbar">
        <h1>网站导航</h1>
    </div>
    <div class="content">
        <h2>内容区域</h2>
        <p>向下滚动查看导航栏固定效果...</p>
        <p>Lorem ipsum dolor sit amet, consectetur adipiscing elit.</p>
    </div>

    <script>
        const navbar = document.getElementById('navbar');

        window.addEventListener('scroll', function() {
            const scrollY = window.scrollY || window.pageYOffset;

            if (scrollY > 50) {
                navbar.classList.add('fixed');
            } else {
                navbar.classList.remove('fixed');
            }
        });
    </script>
</body>
</html>
示例3:图片懒加载
<!DOCTYPE html>
<html lang="en">
<head>
    <meta charset="UTF-8">
    <title>图片懒加载</title>
    <style>
        body {
            font-family: Arial, sans-serif;
            padding: 20px;
        }
        .image-container {
            height: 300px;
            margin: 20px 0;
            background-color: #f0f0f0;
            display: flex;
            align-items: center;
            justify-content: center;
        }
        .lazy-image {
            max-width: 100%;
            opacity: 0;
            transition: opacity 0.5s ease;
        }
        .lazy-image.loaded {
            opacity: 1;
        }
    </style>
</head>
<body>
    <h2>图片懒加载示例</h2>
    <p>向下滚动查看图片加载效果</p>

    <div class="image-container">
        <img class="lazy-image" data-src="https://via.placeholder.com/800x300/4CAF50/fff?text=Image+1" alt="Image 1">
    </div>

    <div class="image-container">
        <img class="lazy-image" data-src="https://via.placeholder.com/800x300/2196F3/fff?text=Image+2" alt="Image 2">
    </div>

    <div class="image-container">
        <img class="lazy-image" data-src="https://via.placeholder.com/800x300/FF9800/fff?text=Image+3" alt="Image 3">
    </div>

    <script>
        // 图片懒加载实现
        function lazyLoad() {
            const images = document.querySelectorAll('.lazy-image');

            images.forEach(function(img) {
                // 检查图片是否进入可视区域
                const rect = img.getBoundingClientRect();
                const windowHeight = window.innerHeight;

                if (rect.top < windowHeight) {
                    // 替换 data-src 为 src
                    img.src = img.dataset.src;

                    // 图片加载完成后添加 loaded 类
                    img.onload = function() {
                        img.classList.add('loaded');
                    };
                }
            });
        }

        // 初始加载
        lazyLoad();

        // 滚动时触发
        window.addEventListener('scroll', lazyLoad);
    </script>
</body>
</html>
3.2.5 滚动事件性能优化
滚动事件触发频率很高,需要进行性能优化。
使用节流(Throttle)
// 节流函数
function throttle(func, delay) {
    let lastTime = 0;
    return function() {
        const now = Date.now();
        if (now - lastTime >= delay) {
            func.apply(this, arguments);
            lastTime = now;
        }
    };
}

// 使用节流
window.addEventListener('scroll', throttle(function() {
    console.log('滚动位置:', window.scrollY);
}, 200));
使用防抖(Debounce)
// 防抖函数
function debounce(func, delay) {
    let timer;
    return function() {
        clearTimeout(timer);
        timer = setTimeout(() => func.apply(this, arguments), delay);
    };
}

// 使用防抖
window.addEventListener('scroll', debounce(function() {
    console.log('滚动位置:', window.scrollY);
}, 200));
使用 Intersection Observer(推荐)
// 使用 Intersection Observer 监听元素可见性
const observer = new IntersectionObserver(function(entries) {
    entries.forEach(function(entry) {
        if (entry.isIntersecting) {
            console.log('元素可见:', entry.target);
            entry.target.classList.add('visible');
        }
    });
}, {
    threshold: 0.1
});

// 观察元素
document.querySelectorAll('.lazy-image').forEach(function(img) {
    observer.observe(img);
});
3.3 页面尺寸事件
页面尺寸事件用于监听窗口或元素大小的变化。
3.3.1 resize 事件
当窗口大小改变时触发。
window.addEventListener('resize', function(event) {
    console.log('窗口宽度:', window.innerWidth);
    console.log('窗口高度:', window.innerHeight);
});
3.3.2 获取页面尺寸
// 获取窗口尺寸
const windowWidth = window.innerWidth;
const windowHeight = window.innerHeight;

// 获取文档尺寸
const docWidth = document.documentElement.clientWidth;
const docHeight = document.documentElement.clientHeight;

// 获取元素尺寸
const element = document.getElementById('element');
const elementWidth = element.offsetWidth;
const elementHeight = element.offsetHeight;
3.3.3 尺寸事件应用示例
示例1:响应式布局
<!DOCTYPE html>
<html lang="en">
<head>
    <meta charset="UTF-8">
    <title>响应式布局</title>
    <style>
        * {
            margin: 0;
            padding: 0;
            box-sizing: border-box;
        }
        body {
            font-family: Arial, sans-serif;
        }
        #container {
            display: flex;
            flex-wrap: wrap;
            padding: 20px;
        }
        .box {
            padding: 20px;
            background-color: #4CAF50;
            color: white;
            margin: 10px;
            text-align: center;
        }
        .info {
            position: fixed;
            top: 10px;
            right: 10px;
            padding: 10px;
            background-color: rgba(0,0,0,0.7);
            color: white;
            border-radius: 5px;
        }
    </style>
</head>
<body>
    <div class="info" id="info">窗口宽度: 0px</div>
    <div id="container">
        <div class="box" style="flex: 1 1 300px;">Box 1</div>
        <div class="box" style="flex: 1 1 300px;">Box 2</div>
        <div class="box" style="flex: 1 1 300px;">Box 3</div>
    </div>

    <script>
        const info = document.getElementById('info');

        function updateInfo() {
            const width = window.innerWidth;
            let device;

            if (width < 576) {
                device = '手机';
            } else if (width < 768) {
                device = '平板';
            } else if (width < 992) {
                device = '笔记本';
            } else {
                device = '桌面显示器';
            }

            info.textContent = `窗口宽度: ${width}px (${device})`;
        }

        // 初始更新
        updateInfo();

        // 窗口大小改变时更新
        window.addEventListener('resize', updateInfo);
    </script>
</body>
</html>
示例2:全屏显示
<!DOCTYPE html>
<html lang="en">
<head>
    <meta charset="UTF-8">
    <title>全屏显示</title>
    <style>
        body {
            margin: 0;
            font-family: Arial, sans-serif;
        }
        #box {
            width: 300px;
            height: 200px;
            background-color: #4CAF50;
            color: white;
            display: flex;
            align-items: center;
            justify-content: center;
            font-size: 24px;
            margin: 20px auto;
        }
        #info {
            text-align: center;
            padding: 20px;
        }
    </style>
</head>
<body>
    <div id="box">固定尺寸盒子</div>
    <div id="info">
        <p>窗口宽度: <span id="windowWidth">0</span>px</p>
        <p>窗口高度: <span id="windowHeight">0</span>px</p>
    </div>

    <script>
        const windowWidth = document.getElementById('windowWidth');
        const windowHeight = document.getElementById('windowHeight');

        function updateSize() {
            windowWidth.textContent = window.innerWidth;
            windowHeight.textContent = window.innerHeight;
        }

        // 初始更新
        updateSize();

        // 窗口大小改变时更新
        window.addEventListener('resize', updateSize);
    </script>
</body>
</html>
示例3:保持元素比例
<!DOCTYPE html>
<html lang="en">
<head>
    <meta charset="UTF-8">
    <title>保持元素比例</title>
    <style>
        body {
            font-family: Arial, sans-serif;
            padding: 20px;
        }
        .container {
            width: 50%;
            background-color: #f0f0f0;
            padding: 20px;
        }
        .responsive-box {
            width: 100%;
            aspect-ratio: 16 / 9;
            background-color: #4CAF50;
            display: flex;
            align-items: center;
            justify-content: center;
            color: white;
            font-size: 24px;
        }
    </style>
</head>
<body>
    <div class="container">
        <div class="responsive-box">
            16:9 比例盒子
        </div>
    </div>
    <p>调整窗口大小查看效果,盒子始终保持 16:9 比例</p>

    <script>
        window.addEventListener('resize', function() {
            const box = document.querySelector('.responsive-box');
            console.log('盒子尺寸:', box.offsetWidth, 'x', box.offsetHeight);
        });
    </script>
</body>
</html>
3.3.4 尺寸事件性能优化
resize 事件同样会频繁触发,需要进行节流处理:
// 使用节流处理 resize 事件
function throttle(func, delay) {
    let lastTime = 0;
    return function() {
        const now = Date.now();
        if (now - lastTime >= delay) {
            func.apply(this, arguments);
            lastTime = now;
        }
    };
}

window.addEventListener('resize', throttle(function() {
    console.log('窗口尺寸:', window.innerWidth, 'x', window.innerHeight);
}, 250));
3.4 事件综合示例
综合示例:仿京东侧边栏
<!DOCTYPE html>
<html lang="en">
<head>
    <meta charset="UTF-8">
    <title>仿京东侧边栏</title>
    <style>
        * {
            margin: 0;
            padding: 0;
        }
        body {
            height: 3000px;
            font-family: Arial, sans-serif;
        }
        #sidebar {
            position: fixed;
            right: 0;
            top: 50%;
            transform: translateY(-50%);
            display: flex;
            flex-direction: column;
        }
        .sidebar-item {
            width: 50px;
            height: 50px;
            background-color: #666;
            color: white;
            display: flex;
            align-items: center;
            justify-content: center;
            margin: 2px 0;
            cursor: pointer;
            transition: background-color 0.3s;
        }
        .sidebar-item:hover {
            background-color: #c00;
        }
        #backToTop {
            display: none;
        }
    </style>
</head>
<body>
    <h1>仿京东侧边栏示例</h1>
    <p>向下滚动查看侧边栏效果</p>

    <div id="sidebar">
        <div class="sidebar-item" title="京东会员">会员</div>
        <div class="sidebar-item" title="购物车">购物车</div>
        <div class="sidebar-item" title="我的京东">我的</div>
        <div class="sidebar-item" id="backToTop" title="返回顶部">顶部</div>
    </div>

    <script>
        const sidebar = document.getElementById('sidebar');
        const backToTop = document.getElementById('backToTop');

        // 监听滚动事件
        function handleScroll() {
            const scrollY = window.scrollY || window.pageYOffset;

            // 根据滚动位置显示/隐藏返回顶部按钮
            if (scrollY > 300) {
                backToTop.style.display = 'flex';
            } else {
                backToTop.style.display = 'none';
            }
        }

        // 监听窗口大小变化
        function handleResize() {
            const windowWidth = window.innerWidth;

            // 窗口太小时隐藏侧边栏
            if (windowWidth < 768) {
                sidebar.style.display = 'none';
            } else {
                sidebar.style.display = 'flex';
            }
        }

        // 点击返回顶部
        backToTop.addEventListener('click', function() {
            window.scrollTo({
                top: 0,
                behavior: 'smooth'
            });
        });

        // 使用节流优化事件处理
        function throttle(func, delay) {
            let lastTime = 0;
            return function() {
                const now = Date.now();
                if (now - lastTime >= delay) {
                    func.apply(this, arguments);
                    lastTime = now;
                }
            };
        }

        // 绑定事件(使用节流优化)
        window.addEventListener('scroll', throttle(handleScroll, 100));
        window.addEventListener('resize', throttle(handleResize, 100));

        // 初始调用
        handleScroll();
        handleResize();
    </script>
</body>
</html>